Saturday, August 18, 2012

Adding a Second Wireless Router to Your Home Network

Even with today's powerful wireless routers, it seems that coverage doesn't span as far as it used too. I live in a relatively small house and one D-Link Wireless-N router in one corner of the house doesn't seem to do the job in the opposite corner. I was able to get a second router at a steal of a deal, so I decided to add it to my home network. The second router is a Netgear N150 DSL modem + router, but we only want to use it for wireless connectivity... contrary to legitimate doubts this is actually no problem at all.

Follow these steps to add a second wireless router to your home network:
  1. Power up the NEW wireless router but don't plug it into anything quite yet.
  2. Using a computer that is connected to your EXISTING router, go to 192.168.1.1 or 192.168.0.1 (most common IPs) in your browser to access your existing wireless router that already has a modem plugged into it. Lets assume that your EXISTING router is setup at 192.168.1.1.
  3. Now you need to access your NEW router's admin. The easiest way is to plug a laptop into it via LAN cable. Make sure the laptop is not connected to any other networks.
  4. Once in the NEW router's admin, change the IP of that router to 192.168.1.2. (Just match the IP of your EXISTING router, but ending in a 2 instead of a 1).
  5. You also need to disable DHCP server on the NEW router.
  6. Finally, connect a LAN cable from a numbered port on your NEW router to a numbered port on your EXISTING router. Since the two routers are likely far apart, you can use either structured wiring or even a power outlet LAN extender (I am using a NETGEAR one now, thanks Steve!)
  7. You should now be able to access to NEW router's admin from any computer on your network by browsing to 192.168.1.2. Once there, setup your wireless network connection. You may need to use different channels than your EXISTING router in case of any conflict. You should also set the wifi network name as something different from your EXISTING wifi network name, even if you just add a "2" to the end. Make sure to setup security to your personal preference.
  8. You should now have two wireless networks in your house. Depending on your wireless device, you can probably set it up to pick the strongest one at any given time. This way your phone or laptop can hop on and off your two wifi networks to get the strongest signal as you move from one end of your house to the other.


Wednesday, August 15, 2012

JSON Issues when Upgrading from jQuery 1.3.2 to jQuery 1.7.2

On the tails of my recent post about the jQuery 1.8 release comes this example of some of the 'breakage' that can occur when changing jQuery versions. Granted this is an older issue, but if you are on an older version of jQuery (pre 1.5), then you are likely to get hit with this issue whenever you upgrade to a newer version.

In jQuery 1.3.2 and older, $.getJSON is very forgiving of malformed JSON and even inappropriate mime-types. In jQuery 1.4+, things are a bit more strict.

For example, in jQuery 1.3.2 you are able to do this:

Code Snippet:
$.getJSON("test.js", function(json) {
   alert(json);
 });

Remote JSON:
[ 

  {

   value: "blah",

   bar: "none",

   url: "/blah.html",

   desc: "foo"

  },


  {

   value2: "blah",

   bar2: "none",

   url2: "/blah.html",

   desc2: "foo"

  },

]

In jQuery 1.4+, this will not cut it. Your JSON will need to be well-formed and you could also switch over to using $.ajax for further flexibility.

Code Snippet:
$.ajax({
  url: 'ajax/test.json',
  dataType: 'json',
  data: data,
  success: callback
});

Remote JSON (w/ proper mime-type):
[{"value": "blah","bar": "none","url": "/foobar.html","desc": "foo"},{"value2": "blah","bar2": "none","url2": "/foobar.html","desc2": "foo"}]

While you may not have any custom implementations using JSON, don't assume you are home-free. jQuery UI Autocomplete, for example, could break when upgrading from 1.3.2 to 1.4+. That is because it uses $.getJSON behind the scenes instead of $.ajax. If your JSON is well-formed, you should have no issues, but using $.ajax will allow you to return the JSON, process it, and bring it into conformity all before jQuery UI autocomplete knows the difference.

For example, jQuery 1.3.2 may play nice with this:

$( "#search" ).autocomplete({
  source: "search.php",
  minLength: 2
});

However, jQuery 1.4+ may require something like this if you need to get your hands on the JSON before jQuery UI autocomplete does:

$( "#search" ).autocomplete({
  source: function(request, response) {
    $.ajax({
      dataType: 'text json',
      success: function(data) { response(data); }
        url: 'search.php?term=xyz',
        });
    },
  minLength: 2
});

Tuesday, August 14, 2012

Guide: Install Android 4.1 Jelly Bean on Samsung Captivate

Jelly Bean is rumored to come out for the Samsung Galaxy S III later this month, but you can install it now on your Samsung Captivate! Jelly Bean's claim to fame is Google Now (trust me, it is indeed very cool). 
It goes without say, but anything you do to your device is your responsibility. This guide is just to help you navigate the process and files involved. You need to understand and commit to whatever actions you take on your own phone!

  1. Make sure your Captivate is up-to-date via AT&T. It should be version 2.3. (If you need to go back to stock first, look HERE). (Approx 35-40min to go back to stock, then update twice to 2.3 via AT&T)
  2. Now Install ClockworkModRecovery (I use Corn Kernel HERE). (Approx 2 min via Odin)
  3. Save RC5 Kernel HERE, the CyanogenMod 10 ROM HERE, the gApps zip HERE, and the Super User zip HERE to your phone's internal SD card (Less than 10 min to download and transfer to internal SD)
  4. Reboot to Recovery (remove and replace battery, hold down both volume buttons and power button to power on). Wipe Data. (About 3 minutes)
  5. Install the CyanogenMod 10 ROM zip from the SD card. (About 2 minutes)
  6. Reboot to Recovery (remove and replace battery, hold down both volume buttons and power button to power on). (Less than 1 minute)
  7. Install the RC5 kernel zip from the SD card. (Less than 1 minute)
  8. Install the gApps zip from the SD card. (Less than 1 minute)
  9. Install the Super User zip from the SD card. (Less than 1 minute)
  10. Select "Go Back" and then "Advanced -> Fix Permissions" (Less than 1 minute)
  11. Return to main recovery menu and reboot. (About 3 minutes)
  12. Download bootloader screen HERE, Copy the file to System > Media, set permissions as rw-r–r– (About 2 minutes)
  13. Done! (total time approx 1 hour)
All that is left is to sign in to your Google account and restore if you have a backup. Enjoy setting up and using Jelly Bean (CM10)!


jQuery 1.8 Released... What Are The New Features? Is Anything Broken?

jQuery 1.8 was released only a few days ago!
It wasn't without a bit of a wait, but I wouldn't consider it behind schedule by any means.

Should you upgrade? Is it safe? Will your jQuery functions break if you upgrade from 1.7 to 1.8?
Short answer: go ahead and upgrade from 1.7 to 1.8 and do some testing, you should be fine."
Longer answer: if you are running older than 1.7, be careful. Especially if you are still pre-1.5. If you are running jQuery 1.6 or newer you should be good to exchange the jQuery versions and test for inconsistencies. Of course it all comes down to what functions you are using. If you are using older than 1.7 with Ajax/JSON, jQuery UI, or third-party jQuery plug-ins you will surely need to do some testing before going live with the new version.

So, what's been added? Well check out the official information from jQuery... and my highlights and comments below.

Sizzle re-architected: jQuery’s selector engine is faster than ever, thanks to a rewrite (well, really two rewrites) by Timmy Willison. Sure, most browsers have querySelectorAll nowadays, but nearly every implementation falls short in one way or another, creating a road full of cross-browser potholes. Sizzle smoothes that road for you. Plus, you may want those useful jQuery selector extensions like :has() with a complex selector or :contains(). Oh yeah, and there’s still IE6/7 support.
This is what makes jQuery, well, jQuery! The best thing about this update is that it makes all of our old jQuery markup run faster, even if you aren't using the most efficient or modern selectors.

Animations re-imagined: Over time, the animation code in jQuery had become kind of messy. Corey Frang took a head-first dive into that swamp and managed to remove most of the alligators, um, bugs. Most of the changes are under the covers, so existing animations should just work (and work better). But there are also some awesome additions to make animations more general and extendable. One notable and very cool feature is the use of the progress callbacks in Promises. We’re still working on detailed documentation, but we do have a draft. Also, here’s an example of the new code in action: http://jsbin.com/odocid/1/edit.
If you haven't started playing with jQuery animate yet, it looks like now is a good time to start. Evidently, jQuery animate is now a bit cleaner and sleeker, hopefully a bit faster and lighter-weight as a result.

Automatic CSS prefixing: When you use a CSS property, in either .css() or .animate(), we’ll use the correct prefixed property (when appropriate) for that browser. For example, take .css("user-select", "none"); in Chrome/Safari we’ll set the value as "-webkit-user-select", Firefox will use "-moz-user-select", and IE10 will use "-ms-user-select".
I personally love this one. It is painful enough to prefix, -moz, -webkit, and so on in your regular CSS sheets. There has got to be a better way... and now there is! This is not only cleaner, but also more efficient and results in less CSS 'errors' detected by each different browser. Of course, this will also clean up jQuery generated styles by requiring only one style to be set for all browsers.

More than 160 bugs closed: The Sizzle and animation rewrites in particular provided the impetus to fix several long-standing bugs–some of which have been around for two or three years. Mike Sherov tackled most of the open CSS and positioning issues, getting us down to near-zero bugs there. We also haven’t given up and are still pounding away to eliminate annoying differences between IE 6/7/8 and modern browsers, so you don’t have to deal with them.
Nice to see bugs being fixed before they are even noticed by most users. When is the last time you've seen a bug in jQuery? Well they just fixed more than 160 of them, so I'd say it is pretty darn near bug-free. No more excuses to not use jQuery.

Smaller code size: Despite all the code cleanup, new features, and bug fixes, the gzipped file size of jQuery 1.8 is actually a few hundred bytes smaller than jQuery 1.7.2. Size reduction wasn’t our primary goal in this version, but we felt it was important to hold the line on code growth, and we definitely achieved that. Many thanks to Richard Gibson for leading the code-crunching charge across the entire project.
This can make a huge difference in your projects and is another reason to go ahead and update to this version.

Modularity: If you know your project’s jQuery dependencies well, you can use the new grunt-based build system to strip out parts of jQuery that you know you don’t need. What we’ve done here for 1.8 is really just a beginning, you’ll see even more flexibility as we move to later versions.
Efficiency! Have a site that really just needs a specific jQuery feature? Now you can even more easily deploy a custom jQuery just for that use, cutting those page load times down even more.

WHAT’S BEEN REMOVED
The short answer is “very little”. We wanted to provide a generous notice period for deprecated features that will be removed in 1.9, to give people time to adapt their code. Several of the things removed in 1.8 were undocumented internals that some people have cleverly reverse engineered, but it’s always risky to use undocumented features. Here are the items removed:

$(element).data(“events”): In version 1.6, jQuery separated its internal data from the user’s data to prevent name collisions. However, some people were using the internal undocumented “events” data structure so we made it possible to still retrieve that via .data(). This is now removed in 1.8, but you can still get to the events data for debugging purposes via $._data(element, "events"). Note that this is not a supported public interface; the actual data structures may change incompatibly from version to version.

Deferred.isResolved() and Deferred.isRejected(): Calling N-1 boolean methods to get the state of an N-state variable was getting a bit silly, so we added Deferred.state() in jQuery 1.7 to tell you the state in a single call. So, these two older methods aren’t needed anymore. It’s much more convenient for debugging scenarios where you often want to know the state of a Deferred as a string.

$(element).closest(Array) returning Array: This was a strange signature of the .closest() method intended for use by the old .live(), but not used by any other code as far as we know. Normal uses of .closest() returning a jQuery object are not affected by this signature being removed.

$.curCSS: This method was simply an alias for jQuery.css() from jQuery 1.3 onward. Although it has never been part of the documented API, some external code has been known to use it, perhaps thinking it was “more efficient.” Now it’s “more gone.”

$.attrFn: Yet another undocumented item, used to define which methods could be used in conjunction with $(html, props) signature. Although it serves no functional purpose in jQuery 1.8, we are leaving an empty $.attrFn in jQuery to prevent code that uses it from throwing errors. Fair Warning: This will be removed entirely in jQuery 1.9, so update your code!
Plenty of examples of shady jQuery techniques. If you think you are being clever or finding a backdoor to some jQuery functionality, just remember you are likely causing your project to be stuck on whatever version of jQuery you are using and running the risk of encountering undocumented issues very quickly. Just stick to the documentation... that is what future jQuery versions will adhere to for the most part.

Wednesday, August 8, 2012

Android Remote Security Options

Ever wondered just how bad it would be if you lost your smartphone? For many smartphone users it would surely lead to lots of headaches over possible identity theft, fraud, defamation, and a general breach of privacy among other things. While it is easy to set a password lock or lock pattern on your device, it is also easy for a thief to bypass those locks. So what's the answer? Remote security.

iOS users have remote security with a 'locate my device' type of feature built right in called Find My iPhone. Android users don't get this by default out-of-the-box, but do get easy access to tons of apps through the Play Store including a few of the remote security persuasion.

I would venture to guess that Lookout Mobile Security is the most widely used Android remote security option out there, with over 338,000+ ratings on the Play Store. This is for good reason as it offers features such as remote siren, remote wipe, GPS device location, and decent mobile security. 
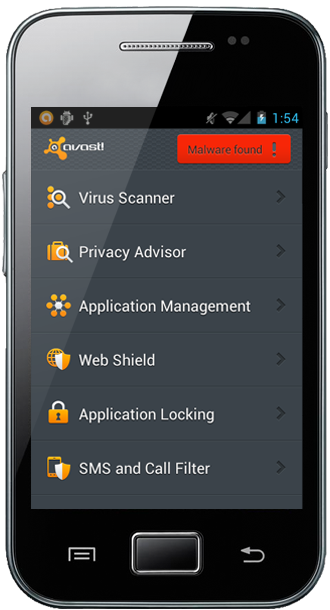
Avast! has released a free version of their mobile security app for Android. If you've ever explored PC security options, Avast! is definitely in your vocabulary. They do a great job with desktop security, but how about mobile? Well, they have not disappointed! The Avast! app offers excellent protection against everyday mobile security concerns with security features like anti-virus, web-shield, and even a firewall. This app goes a step further to offer remote security... and the most fully featured I have yet to see.

Some Avast! remote security options include the ability to monitor calls and texts your lost phone sends and receives, push messages to the phone, and of course locate, lock and wipe. You can even automate the behavior on indicators such as too many failed logins or the sim card being swapped out. To top it off, the actual control of the app is well protected. You can custom name the app once installed and set a password for changing settings within the app. The commands you can send to your phone via SMS are extensive to say the least... and you can even create your own custom remote commands! Give it a look below - it will definitely get your gears turning!

Avast! has finally made remote security apps interesting. While locate, lock, and wipe is cool, having the flexibility to interact with your lost device through a wider range of functionality opens up a whole new world of worst-case-scenario disaster recovery options. If your interest is piqued I suggest taking a look at the  Avast! documentation to see just how many commands you can throw at your lost Android... have fun setting it all up!

Lookout Mobile Security remote (web) commands
LOCATE
Pinpoint device on map.

SCREAM

Sound alarm on device.

LOCK

Prevent use of device.

WIPE

Delete data on device.


All SMS commands must begin with your avast! password. For example, if your avast! password is set to 2222, a lock command should look like this:

2222 LOCK
LOST
Sample: 2222 LOST
Marks the phone as LOST. This command initiates the same actions as a SIM card change, depending on the protection behavior settings.
FOUND
Sample: 2222 FOUND
Marks the phone as FOUND. This command disables the phone lock as well as the siren alarm.
LOCK
Sample: 2222 LOCK
Lock the mobile phone
UNLOCK
Sample: 2222 UNLOCK
Unlock the mobile phone
MESSAGE <message text>
Sample: 2222 MESSAGE Give back my phone!
Will display a message on the phone. Can be dismissed. Use LOCK and SET LOCKTEXT to display a sticky message
SIREN ON
Sample: 2222 SIREN ON
Turn siren on
SIREN OFF
Sample: 2222 SIREN OFF
Turn siren off
LOCATE
Sample: 2222 LOCATE
Locate the device
LOCATE <interval duration in minutes>
Sample: 2222 LOCATE 5
Track the device continuously
LOCATE STOP
Sample: 2222 LOCATE STOP
Stop continous tracking
CALL [phone number]
Sample: 2222 CALL
Sample: 2222 CALL +43660333555
If no phone number is given this command causes the phone to call you back. If you give the phone number the phone will call the given number
FORWARD SMS [phone number]
Sample: 2222 FORWARD SMS
Sample: 2222 FORWARD SMS +43660333555
If no phone number is given, incoming SMS will silently be forwarded to the phone that sent the command. If a phone number is given, incoming SMS will be forwarded to the given phone number. This command overrides all previously issued SMS-forwarding-settings.
The forwarding can be cancelled by issuing the FORWARD SMS STOP command or by launching avast! Anti-Theft.
CC SMS [phone number]
Sample: 2222 CC SMS
Sample: 2222 CC SMS +43660333555
Same as FORWARD SMS, but will not delete the SMS after forwarding which means that the forwarded SMS will still be delivered to the target phone (CC means carbon copy). This command overrides all previously issued SMS-forwarding-settings.
The forwarding can be cancelled by issuing the CC SMS STOP command or by launching avast! Anti-Theft.
CC CALLS [phone number]
Sample: 2222 CC CALLS
Sample: 2222 CC CALLS +43660222333
By issuing this command you can request SMS notifications about incoming calls. The notifications will be sent to the phone that issued the command if no other phone number is given. This command overrides all previously issued call-forwarding-settings.
We did not implement direct forwarding of the calls as this works differently in the networks around the world. Also it is not possible to hide the forwarding settings from the thieves eyes reliably.
The forwarding can be cancelled by issuing the CC CALLS STOP command or by launching avast! Anti-Theft.
CC ALL [phone number]
Sample: 2222 CC ALL
Sample: 2222 CC ALL +43660222333
Combines the CC SMS and the CC CALLS command. This command overrides all previously issued SMS- and call-forwarding- settings.
The forwarding can be cancelled by issuing the CC ALL STOP command or by launching avast! Anti-Theft.
WIPE
Sample: 2222 WIPE
Wipe all data from the phone
GET <query limit> SMS
Sample: 2222 GET 10 SMS
Query SMS messages
GET <query limit> INBOX SMS
Sample: 2222 GET 10 INBOX SMS
Query received SMS messages
GET <query limit> SENT SMS
Sample: 2222 GET 10 SENT SMS
Query sent SMS messages
GET <see above> SMS FOR <phone number>
Sample: 2222 GET 10 SMS FOR +43660333555
Query SMS messages matching the phone number given
GET CONTACTS
Sample: 2222 GET CONTACTS
Query the contacts from the address book
GET LOG <query limit>
Sample: 2222 GET LOG 10
Query the call and SMS log
LAUNCH
Sample: 2222 LAUNCH
Launches avast! Anti-Theft user interface
CLOSE
Sample: 2222 CLOSE
Closes avast! Anti-Theft user interface
REBOOT
(only for rooted devices)
Sample: 2222 REBOOT
Reboots the device
SET OWNER <name of owner>
Sample: 2222 SET OWNER Charles Chaplin
Will change the device owner name
SET PASSWORD <access code>
Sample: 2222 SET PASSWORD 3333
Will change the avast! password. You will need to provide a password of 4-6 digits
SET FRIEND 1 <phone number>
Sample: 2222 SET FRIEND 1 +43660122220192
Will change the phone number of the first friend. Provide a valid mobile phone number
SET FRIEND 2 <phone number>
Sample: 2222 SET FRIEND 2 +43660122220192
Will change the phone number of the second friend. Provide a valid mobile phone number
SET ONLYFRIENDS <friends mode>
Sample: 2222 SET ONLYFRIENDS 1
Will change the SMS command authorization mode (0 = allow all numbers, 1 = allow only friend commands)
SET LOCKMODE <lock mode>
Sample: 2222 SET LOCKMODE 1
Will change the phone lock protection behavior (0 = do not lock, 1 = auto lock)
SET SIRENMODE <siren mode>
Sample: 2222 SET SIRENMODE 1
Will change the siren protection behavior (0 = no siren on lock, 1 = siren on lock)
SET APPLOCKMODE <app lock mode>
Sample: 2222 SET APPLOCKMODE 1
Will change the program manager or phone setting protection behavior (0 = no setting active, 1 = deny program manager, 2 = deny phone settings)
SET USBLOCKMODE <USB lock mode>
(only for rooted devices)
Sample: 2222 SET USBLOCKMODE 1
Will change the USB debugging access protection behavior (0 = do not lock USB debugging access, 1 = lock USB debugging access)
SET FORCEDATAMODE <force data mode>
(only for rooted devices)
Sample: 2222 SET FORCEDATAMODE 1
Will change the force data connection protection behavior (0 = do not force data connection, 1 = force data connection)
SET BATTERYSMSMODE <battery mode>
Sample: 2222 SET BATTERYSMSMODE 1
Will change the low battery notification protection behavior (0 = do not notify on low battery, 1 = notify on low battery)
SET LOCKTEXT <lock text>
Sample: 2222 SET LOCKTEXT Please call me back at +4313283483
Will change the custom lock text
SET AUTOGPS <gps mode>
Sample: 2222 SET AUTOGPS 1
Will enable or disable automatic enablement of GPS (0 = turn off, 1 = turn on)
SET WIPEMODE <wipe mode>
Sample: 2222 SET WIPEMODE 1
Will enable or disable thorough wipe (0 = turn off, 1 = turn on)
SET PROTECTION <protection mode>
Sample: 2222 SET PROTECTION 1
Will enable or disable Anti-Theft protection (0 = turn off, 1 = turn on)
Caution: By using this command you will completely disable the Avast! Anti-Theft system thus rendering the Anti-Theft protection useless.

Implement own remote commands

Avast! Anti-Theft is able to launch any programs on the phone and pass data to the launched program.
SMS command: <Activity or service name, fully qualified> <arguments>
Samples:
2222 at.domain.package.Activity Test will start the activity OR service at.domain.package.Activity and pass Test as an parameter to it.
2222 at.domain.package.Activity This is my command line will start the activity OR service at.domain.package.Activity and pass This is my command line as an parameter to it.
The activity or service needs to be positioned on the root of the package (sub-packages are NOT supported).
Data transfer is done via Intent:
Intent i = new Intent();
i.setFlags(Intent.FLAG_ACTIVITY_NEW_TASK);
i.putExtra("number", origNumber);
i.putExtra("cmd", data);
i.setComponent(cName);
This means you can then read (in your service or activity) the sender number in the String extra number and the command from the String extra cmd.
Anti-Theft always tries to start an Activity first, if none is found it tries to start a Service, if this fails it will reply with an error SMS.

Monday, August 6, 2012

Kicking off the new blog!

And it begins...

Stay tuned for interesting news, opinions, code examples, tutorials, and brain dumps!